Dbash44
Avid Member
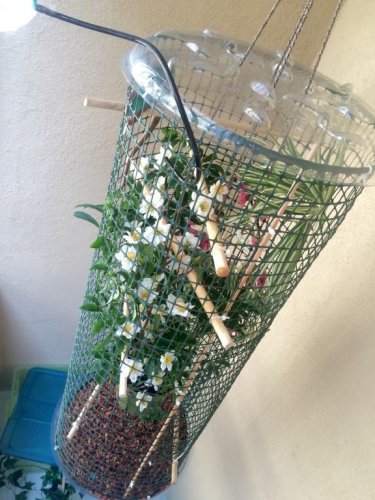
Through different research and through topics found on chameleon forums, I was able to put together my own rendition of an outdoor cham enclosure. In no way am I claiming rights to this, I just want to give back to that which has given me so much knowledge. I am not responsible for any injuries to you or your animals—use to your own discretion.
Altogether this cost me about $30, some supplies I had while others I ended up purchasing. You can get everything at your local Home Depot. In my opinion, you can get better quality plants from a nursery, which I did.
Supplies:
• Plant Saucers x2 (top and bottom) (I used 16in. for largest width/circumference of enclosure; also it was the largest I could find)
• Parachute cord (4x for height of enclosure plus 4 extra feet for handing and knotting purposes.)(Easiest to buy by 100ft spool—like $4 or so.)
• Zip Ties about x30 (Depends on how big project is; you can always buy more than you need to be sure, plus beats another trip to store.)
• Drill Bits (for creating holes in plastic saucers for zip ties and parachute cord; size up to you, just make sure its large enough for each step)
• Lighter (to burn ends of parachute cord to make sure it doesn't fray/separate)
• Small magnets (I prefer chrome plated so the ceramic doesn’t get funky)
• Live plant in plastic pot (optional; I prefer for humidity and for natural look; refer to plant database on forums for OK plants—I chose schefflera)(Also make sure you disinfect plant from any pesticides using warm water)
• Organic soil (for plant; fertilizers can impact your cham if ingested)
• Bark for bottom of enclosure (optional)
• Non toxic artificial plants/branches for decoration/climbing (I’ve purchased artificial plants from Michael’s for years and they seem to work well as long as they’re properly disinfected. You can always use ones bought from pet store, I just like variety and color.)
• PLASTIC Poultry Fencing (I used this ‘cause of my paranoia of metal fencing/hardware cloth; since this is in the sun, I figured metal retains heat and could potentially burn my cham’s feet)(Also make sure the holes of the fencing aren’t too big for your cham to escape!)
• One medium sized dowel (optional)(To add extra support to cage near door)
• Heavy Duty Leather Hole Punch (optional)(makes certain holes easier to punch, though a drill is always feasible)
• Ceiling Hook (I used Ook Hook for stucco/concrete since I was hanging it from the stucco ceiling on my patio)(Of course you can hang with nails in wood or however you please)
• Drill Bit for stucco/concrete (If you don’t already have the proper drill bit for the medium your drilling into for the hook, this will be needed so you don’t screw that medium up. Also make sure you get the right size bit according to what the packaging for the hook says in order to install it properly.)
• Hot glue, or non toxic glue/non toxic silicon
Procedure:
The first thing is to gather all your supplies (“mise en place” as we call it in the food industry). This way you will be sure you have everything ready and not making trips to the store mid project.
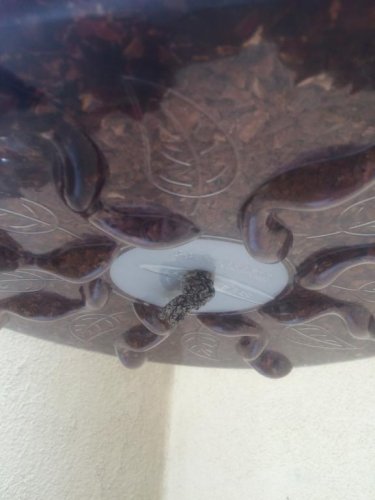
Start by grabbing the first saucer. Drill a hole big enough in the middle for four threads of parachute cord to fit through, but NOT too big! We want the cord to just fit through the hole once we get to that step. This will be the biggest hole you will drill. REFER TO PICTURES FOR NEXT STEP AS IT CAN BE EASY TO MESS UP!!! Next, hole punch/drill holes in the same saucer’s lips at 12 o’clock, 3 o’clock, 6 o’clock, and 9 o’clock. Hole punch/drill holes about a half inch below those four. Put saucer aside.
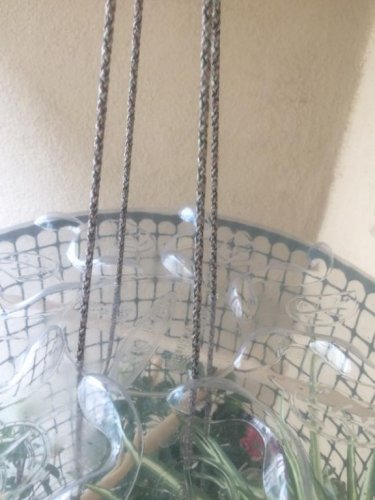
Grab the second saucer and start by drilling eight holes in the same coordinates and the last eight. REFER TO PICTURES FOR NEXT STEP AS WELL!!! Next, drill four holes near the center of saucer. This will be in a square pattern, all the same distance from each other (symmetrical). You can use a marker to place dots of where you will drill before you do so. This will act as the place for the parachute cord to feed out of the top to access the hook. Put aside.
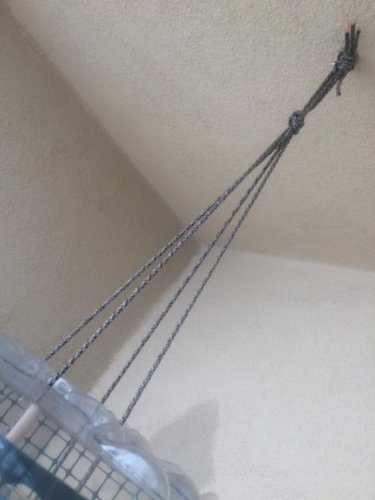
Next order of business is to prepare the parachute cord. How tall will your enclosure be? Make sure you have enough measured out to cover 4x the height plus about four extra feet for knots and creating a loop to hang the enclosure from. *You can always cut off more cord once the project is finished, but it’s way harder to add to it.* Use lighter on cut ends of the cord. Once this is complete, line up the four pieces and tie a knot with all four on one end and pull tight. Feed this through the first saucer that has the large hole in the middle. Make sure the knot stops on the underside without going through the hole. You now have your base set up.
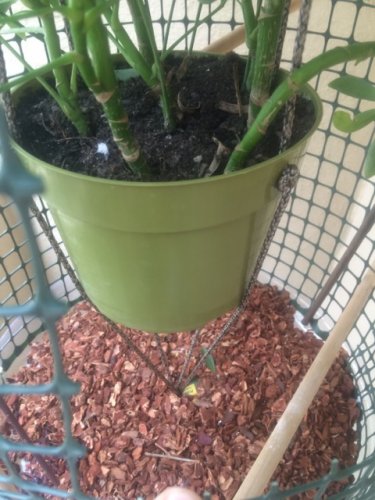
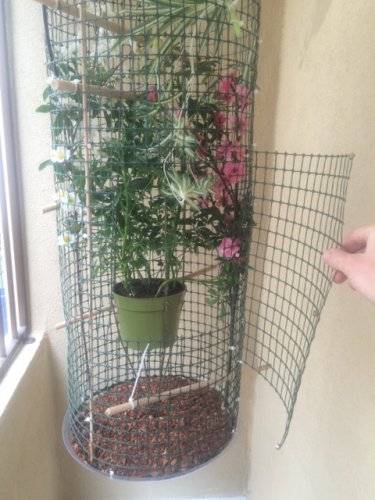
**Note: This, too, is optional, but I strongly recommend it. I figured it is going to put less stress on the bottom saucer of the project; a heavy plant placed directly on the saucer may cause the saucer to snap.** This part can be a bit tricky. I would also suggest you look at the picture of how I hung the plant mid air in the cage for this. With the four strands you have coming out of the top of the bottom saucer, tie one knot in each about a quarter way into the remaining lengths. Try your best to make sure they are all even with one another!
Grab your plant and hole punch/drill four holes at 12 o’clock, 3 o’clock, 6 o’clock, and 9 o’clock on the top part of the plastic pot that it’s in. Now feed the four strands of knotted cord through the four holes in the plastic pot of your plant. Simultaneously, bring the remainder of the cord through the four holes you drilled symmetrically on the second saucer. When doing this step the second saucer will appear to be upside down, thus feeding the cord through the top of the saucer itself. Once through, tie a knot using the ends of the four strands. Now there should be no way the cord can be pulled out of any of the holes. Additionally, the plant will not be suspended at this point and will not be till it’s hung.
At this point you should start to see how the enclosure will be coming together excluding the fencing. For the fencing length you first need to know the circumference of your saucers; the length all the way around the outside of them. What is the diameter of your saucer? Simply, it’s the size of saucer you bought (as I said per the supplies list, mine was 16in.). SO, diameter = size of saucer. You want to take this number and multiply it by Pi, 3.14. My result, give or take, was about 51 (51in.) At this point I wanted to have some slack in the fencing to assure myself it wouldn’t be too short once installed, so I added two inches, totaling 53 inches in length.
**Alternatively you can just cut one piece of fencing to fit around the saucers according to your best judgment.**
Now take that piece of fence you just cut and stand it up in the middle/inside of the two saucers. The fencing should have a curve to it from the packaging; use this to your advantage. This should look like a fence sandwich now. YUM! Feed the zip ties through the holes on the rim of the top (second) saucer and around one of the holes of the top of the fence. Repeat this three times till you have the fence as taunt as you please all the way around the top saucer. Repeat this process with the bottom (first) saucer. Now your project should be one piece. REFER TO PICTURE IF YOU’RE CONFUSED BY THIS!
At this point, use zip ties to connect the ends of the fencing together; cut remaining fencing off if you choose. Now you may be questioning how you’re going to get your lil’ buddy in and out as well as the rest of your decorations. Designate a spot for the enclosure door. Mine ended up being near the seam of the cage and about 12in. x 12in. The size should also be large enough to fit your arm in to. Cut a hole in the enclosure to the desired size. Now with your unused roll of fencing cut out a square slightly larger than the hole you cut into the cage. You can use the scrap piece you cut from the cage as a stencil to know what new size to cut. I did about 3 inches (two squares) larger on each side. With the larger piece use zip ties on one side to attach it to enclosure. These will act as hinges on your door.
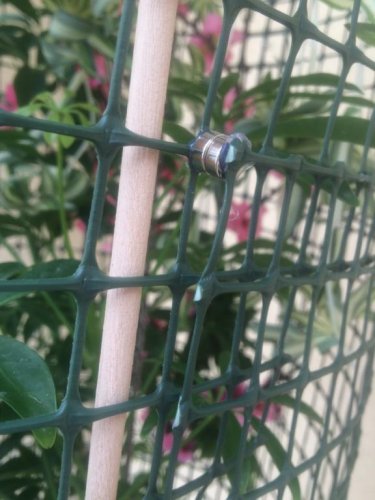
Time to bust out the hot glue and magnets. On the side opposite to your hinges, glue one magnet on the top and bottom inside corners of the door itself. Find where the magnets will attach to the frame of the cage. Glue two more magnets at those two points. Refer to pictures for further details. You now have your door and it should look pretty discrete!
**This next step you may not encounter, if it does not apply to you omit it.** “But wait, Dylan, the cage is sort of caving in near the door!?!?!” Simple fix. Use the medium size dowel you purchased and cut it to the height of your cage. Either insert it through the door or through the top or bottom. It should be a bit flexible to the point of which you can bend it enough to slip into the enclosure. Find the best place for it against the inside wall near where the cage is caving in and zip tie it tightly. You can judge this by the one you see in the pictures attached.
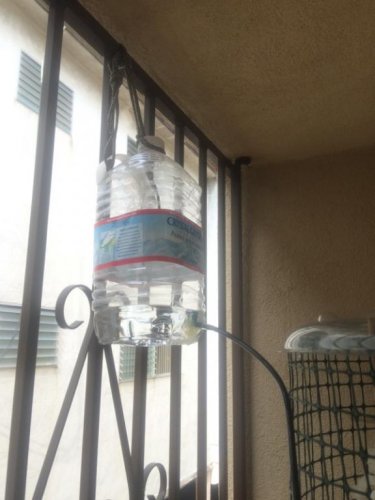
GOOD NEWS! You’re damn near done! WOOO! The final steps to this will vary upon your personal preference. Since your project is ready to be hung, find a place to install your hook. Once it’s installed, test your enclosure to make sure the knot of parachute cord you tied at the top can lift it. This is when you will notice the plant suspended and, if each step was executed properly, level (if not, adjust by untying the parachute cord on top or bottom and pulling inside the enclosure via the door; adjust; redo knot when finished). If everything seems A-ok then it’s time to throw it up on the hook! Make sure the knot is above the hook (if you didn’t already know). To conclude your project, add the bark and any other decorations you desire. I would strongly advise a dripper which can be made very inexpensively and easily. Use the search tab on this forum to look up “DIY dipper”. This can be hung somewhere near the cage and the airline tubing easily inserted through one of the holes in the fencing. Also, I used dowels for braches and zip ties to hold them up. That’s totally up to you. I just prefer dowels ‘cause I cut each to length. Another reason is that I can buy different sizes to accommodate to healthy exercise for my cham. It’s said that different thicknesses of branches is beneficial for your chameleon’s well being. Again, it’s all up to you, for these are all just suggestions. Enjoy your new enclosure knowing your cham can get a sweet tan outdoors now! Just kidding!
Thanks, Everyone!
~Dylan B.
