dragon strand ideas

junglefries

Avid Member
Looking at remodeling some of my baby cages. Was hoping some of you'll mght post some ideas and hopefully LOTS OF PICS so i get it right the first time. I hate re-doing. This will be my third remodel, i think. Maybe fourth. I know the 4 lot baby cages are pretty simple fitting side by side on an 48" x 18" stand. I am looking for something imaginative. Something different. Can even be different cages, i don't care. I just want this time to last for a couple years, hopefully. Now, i use two 36" reptibreeze side by side on top shelf with either two 30" (or 20") reptibreeze side by side below. Most all my stands are 36"l x 18"w. So, i would need new stands for dragon strand cages. My 48" cages are all outside at the moment. Never get enough of that free UVB.
 
I'm loving the products Dragon Strand is putting out. They look so neat and professional looking. My only concern with them is the price. However, if I was a legitimate business, I think that's what I would invest my money in. I personally like being neat, clean, and organized.
 
The Dragon Strand products do cost a little bit, however the quality is excellent and the customer service is even better. I found them before coming to this forum and couldn't be more happy with their setup.
 
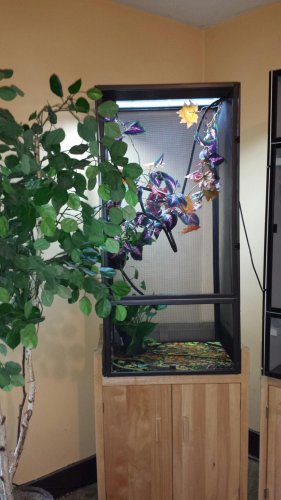
What I did with a dragonstrand cage- not the baby one but ...
I bought a kitchen cart on wheels for it from overstock and made it except I didn't put in the drawer - I just completed my panther cage with a bigger cart and two cages that I have a divider for - I wanted it to work for smaller chameleons if in the future (hopefully far away future) something were to happen to Chumley -
I now have 2 small carts for my girls - the dragonstrand fit perfect so I had Canvas build me one the same size for another cart so I could take advantage of screening on all sides but not need a blind.
 

Attachments

  • canvas cage.jpg
    canvas cage.jpg
    161.1 KB · Views: 335
I'll speak a bit on the Dragon Strand Nursery Cage System mentioned. You have obviously done your research so you probably have seen some of these photos, but I'll add some commentary that shares some of my experience with set-up.

Over all set-up:
The whole idea of the cages, of course, was to make raising a clutch an organized and efficient operation. So they are designed for that 18" deep rack system and, as you have noted, they really shine on the 48" wide system where you find the greatest efficiency between UVB bulb cost and cages serviced. Below is one possible set-up for the misting/UVB/Light/spot lamp configuration.

light-placement_zps61601c5e.gif


The depth of the cages allows for a misting nozzle up front, the width of a standard dual fluorescent fixture, and a small spot lamp. One thing we need to watch out for is that with the narrowness of the cage and the solid sides these cages are very efficient in lighting and heating the cage area. If you are going to be using UVB bulbs then ensure that there is a place where the baby may escape the UVB. A heavily leafed area would suffice. A low UVB rating is also recommended due to the entire cage being within the effective range of industry standard UVB blubs.
For reptiles desiring a morning warm-up, a small spot light may be used. In addition to a timer, use a low wattage (24-29W) or a system with a dimming function to control the heat output. Once again, these cages do not leak heat into the room like screen cages do so you'll want to use spot lights appropriately.

Water system:
Automatic misting systems may be installed from the top. The cages are designed to have the mist spraying from front to back so the sides and back hold the mist in and off of furniture or walls. The water will accumulate on the floor and provide humidity through evaporation. When there is enough water to create a flow the water will flow into the drainage tray below.
The overflow water will gather in the included Drainage Tray and evaporate there. If more water collects than evaporation can remove, water may be removed by a simple turkey baster or a wet/dry vac. I use a wet/dry vac commonly, and cheaply, found at Home Depot called the “BucketHead”. (If you are handy with tools you may install a constant draining bulkhead.)

Interior Decorating:
Interior decorating may be simple to complex. The simplest method is to put one or two small potted plants on the bottom with sticks placed strategically. The next level up is to hot glue fake leaves and vines. It can go all the way up to cork sides and hardened foam structures.
For babies I suggest leaving the bottom floor plain white PVC. This makes monitoring your animals health via their poop much easier. You will be able to tell how much they are eating and how hydrated they are.

1) Pot and Sticks method: Put in a favorite small potted plant and some small sticks for climbing.
Pros: Simple to build up and the potted plant gives some humidity lasting beyond the misting cycles.
Cons: pots on floor give feeders an easy hiding space. Anything resting on the floor of the cage interferes with quick cleaning. We breeders know that the biggest consideration of keeping a breeding colony is daily maintenance: feeding and cleaning. Being able to clean in the most time efficient manner and still getting the job done is critical. The picture below shows the proper use of the trap door. By lifting the doors in a row and then cleaning each of the floors I can do floor cleaning for a 24 cage rack in under ten minutes. (The cages being cleaned in the pictures below are the fake vines and leaves method)

Cleaning-Time_zpsf17005ef.gif


2) Fake vines and leaves: Wind artificial vines back and forth and attach fake plants. Simple and effective. Ensure, though, that there is enough foliage to give hiding spaces and a chance to move in and out of the light as the baby desires. Hot glue guns work well with the PVC walls allowing you to attach fake vines or real sticks/branches in any combination you can think of.
Pros: Leaves the floor clear for easy maintenance; clear floor for health monitoring; Easy to clean the leaves when necessary; fake vine is a great way to utilize all available space; set-up will be good long term.
Cons: Low humidity gradient


Interior-Decorating_zpsab1a4fec.gif


Panther-in-Nursery-Cage_zps0a812222.gif


3) Naturalistic: Much more work, but attractive and brings definite benefits. Combine cork panels on the walls and "Great Stuff" planter on the back. In this set-up, thin cork panels can be siliconed to the wall area. This lessens the reflection of the UVB and Heat, but it also allows you to create more heat/UVB gradients. A small pot stuck to the rear of the cage and suspended off the floor allows the cleaning efficiency discussed above. In this example, I used the expandable foam called "Great Stuff" to create a planter stuck to the walls. Suspending the plant gives me room in the plant's shadow to provide a wide range of gradients even in the small space.
Pros: humidity retention, UVB gradient, attractive, clear floor for health monitoring
Cons: suspended pot uses up space; each cage is a good deal of work to set-up

Naturalistic-nursery_zps68e72794.gif


In the end, it is great to see more and more people putting concentrated effort in their set-ups for the babies. We have all gone through the "bin" method and I am glad we are getting to the point in our art where the collective "we" are spending the appropriate time into doing the best we can for these babies' critical first months. It is a long term mindset that strengthens us as a community.

Bill
 
I will say for raising clutches of babies I cannot think of a more efficient method than the nursery cages. I raise my babies in tubs until they are 1 month old and then move the whole clutch to the individual cages.


It is so much easier to monitor the health of each animal. I can tell what eash is eating (and pooping) as well as check urates, etc....

Just sharing....
 
Back
Top Bottom