How do you keep your silk worms??

I find humidity is the key. Too much and things get moldy and dirty. Too little and they have trouble molting.

I keep my eggs and new hatchlings (kego) in a bin with a lid. That keeps their food moist longer and helps the kegos get thru the first molts.

Then I crack the lid a bit until they are a little bigger and then I remove the lid and replaxe food more often (as it dries out faster). If I left the lid on at this point it would create far too much humidity and their poop and old food would not dry out.
 
I'm still trying to figure out the egg laying process best practices, but the rest I have down!

I start the eggs off in a large shallow container (with lid) with a few rolled up pieces of paper towel for humidity. Once they begin to hatch, I add my food in small strips. My food - i put in tupperware that's fairly narrow but deep, so the food cooks out as a giant cube. I then slice that into a "sheet", which I then break down into about 1/4"x1/4"×2" strips. I do this specifically for the hatchlings as once they turn from black fuzzies to tiny looking silkworms, I use the food to transport them.

I move the food chunks with worms aboard into deeper, but smaller, shoe box sized containers (with lids). I then add more strips to spread them out. I continue to pair them down until I get about 100 or so worms per shoebox. I start feeding them off once they get about 1.5" to give them plenty of room.

All my bins have 1 layer of paper towel on the bottom to absorb moisture from both the food and the frass (poop). It also helps give the worms traction as they cant grip plastic until they "silk" over it.

Here are some photos:

20191215_175347.jpg

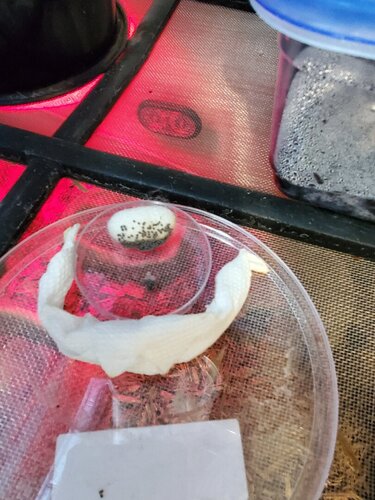
This is my hatching area - top of a skink cage for heat and humidity. Once I see a hatchling they go to the bigger box.

20191215_175407.jpg

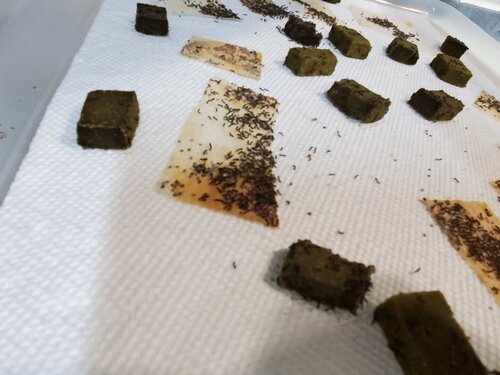
These are the black fuzzies moving out of the petri above out to the food chunks. After a few days they go to individual bins.

20191215_175340.jpg

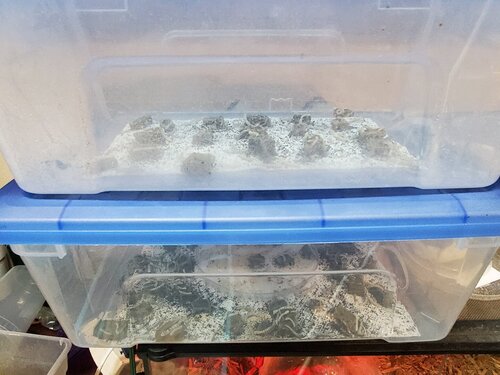
Final resting place for my feeders. These boxes don't seal and the lid has 2 handles that snap down... however, I usually use one handle to prop one end of the lid open to vent. Once they get to the 2-3" size, they go through food so quick you don't need a lid - you'll actually want the air to dry out the grass to prevent mold.

As a side note, I used to use Mulberry Farms and had a very bad experience with about 5 batches of their eggs and customer service thereafter. Since then, I've gotten eggs and worms from @snitz427 and have had overwhelming success (literally overwhelming). Shes also has great customer service, lol!

Best of luck!
 
I'm still trying to figure out the egg laying process best practices, but the rest I have down!

I start the eggs off in a large shallow container (with lid) with a few rolled up pieces of paper towel for humidity. Once they begin to hatch, I add my food in small strips. My food - i put in tupperware that's fairly narrow but deep, so the food cooks out as a giant cube. I then slice that into a "sheet", which I then break down into about 1/4"x1/4"×2" strips. I do this specifically for the hatchlings as once they turn from black fuzzies to tiny looking silkworms, I use the food to transport them.

I move the food chunks with worms aboard into deeper, but smaller, shoe box sized containers (with lids). I then add more strips to spread them out. I continue to pair them down until I get about 100 or so worms per shoebox. I start feeding them off once they get about 1.5" to give them plenty of room.

All my bins have 1 layer of paper towel on the bottom to absorb moisture from both the food and the frass (poop). It also helps give the worms traction as they cant grip plastic until they "silk" over it.

Here are some photos:

View attachment 254755

This is my hatching area - top of a skink cage for heat and humidity. Once I see a hatchling they go to the bigger box.

View attachment 254757

These are the black fuzzies moving out of the petri above out to the food chunks. After a few days they go to individual bins.

View attachment 254756

Final resting place for my feeders. These boxes don't seal and the lid has 2 handles that snap down... however, I usually use one handle to prop one end of the lid open to vent. Once they get to the 2-3" size, they go through food so quick you don't need a lid - you'll actually want the air to dry out the grass to prevent mold.

As a side note, I used to use Mulberry Farms and had a very bad experience with about 5 batches of their eggs and customer service thereafter. Since then, I've gotten eggs and worms from @snitz427 and have had overwhelming success (literally overwhelming). Shes also has great customer service, lol!

Best of luck!
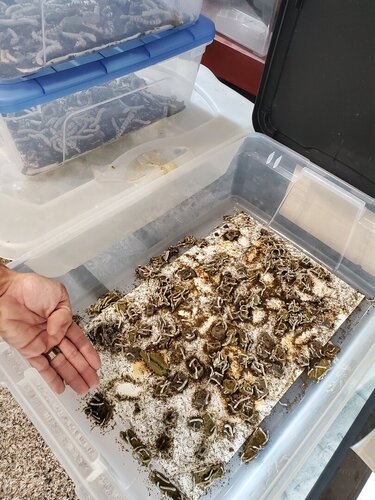
Here's more of my bin a few days after hatching. This is the size I start moving them to other bins. If you keep the cluttered they tend to get silked over while eating or not have room to molt. Plus they seem to grow way quicker with more space.

20191230_171140.jpg

Hand for reference. The two bins with blue lids are my mature, feeding size worms. Directly below them is another bin of hatchlings.

I'd like to add that this is pretty high production rate. I used very similar number of eggs as previous attempts but have MUCH better success with this batch of eggs/worms/moths. I am feeding 7 different chams and a beardie. I have had and will have again, plenty left over. The first go round I only saved 15 cocoons and didn't have nearly the same scale of result.

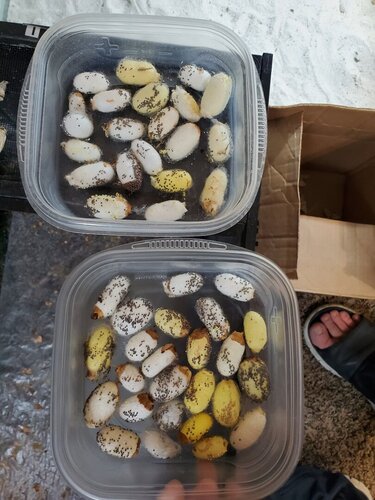
Here are my eggs (clearly not as thought through):

20191230_162751.jpg

I also have a few hundred in the fridge as well as a thousand or 3 scattered throughout the viv below. Next time I'll be going with the box method!!
 
Back
Top Bottom