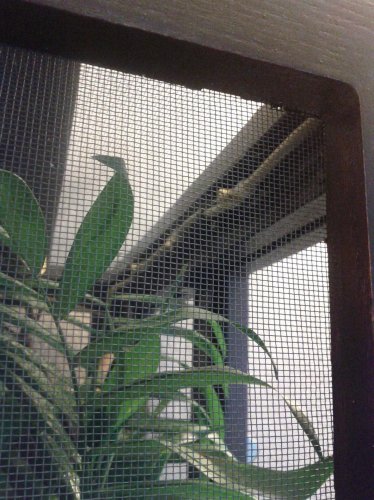
My first cage build.

Almost there...

Spent some more time working on my cage project and was able to get everything finished up except for the watering system.:)


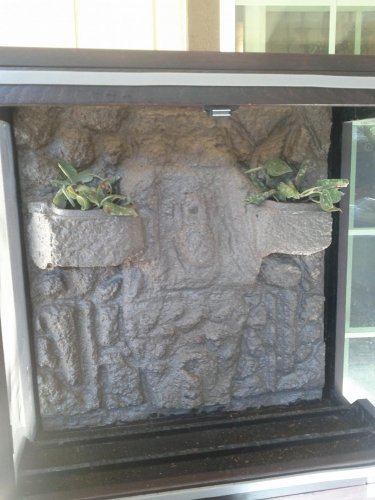
Here's how my fake rock wall turned out with a couple of small pothos in it that will eventually hang down it.
IMG_20120619_174754.jpg


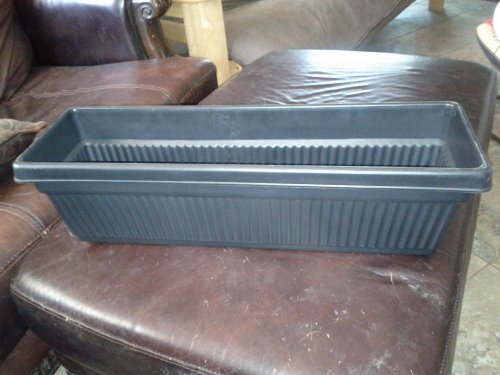
I couldn't find a planter for the center that I liked so I bought this one and modified it.:)
IMG_20120617_132229.jpg


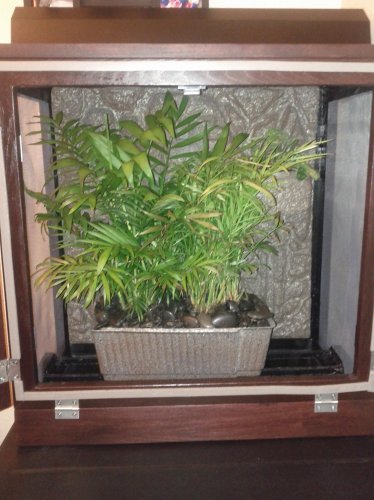
I cut about 1.5" from the top and a little over 10" in length from the planter I bought then glued the pieces together, caulked in the gaps, painted it with the stone textured spray paint to match the background, and then sealed it. It now fits in my cage without taking up too much room. Oh and I planted two small neathe bella/parlor palms in there in case anyone was wondering. I think it looks very tropical lol. All the plants were washed, rinsed, and re-potted and the soil covered with some black river rock.
IMG_20120619_200740.jpg


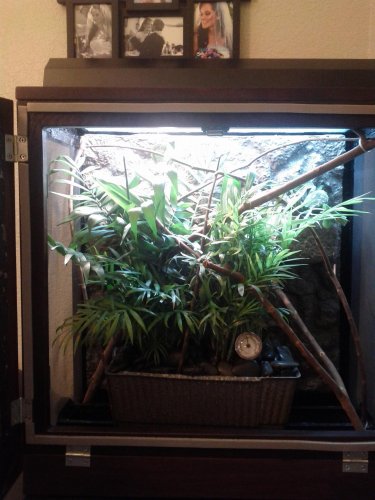
And here's how the inside is looking with the plants, sticks, and lighting all set up. It's a little crowded in there right now and I'm thinking that I'll have to trim some more of it out. Please let me know what you guys think of it...
IMG_20120619_222944.jpg


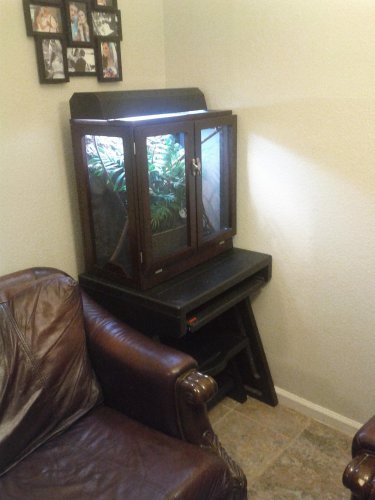
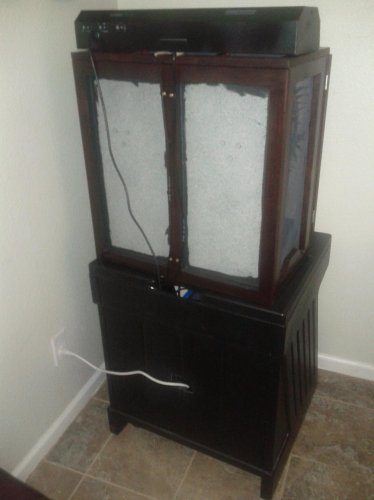
Here's how it looks all set up in our living room. It will eventually be moved into a less crowded room once I'm able to get my office set back up after our room mates move out. I used an old TV stand that I got at a Good Will a while back to put the cage on and it has an empty area underneath where I can put the containers for the watering and drainage systems. Oh and that's a 24" Zoo Med Combination Hood that I painted satin black. It houses a 24" Zoo Med Reptisun 5.0 fluorescent light and one 40w household bulb for now but it actually has two incandescent outlets.
IMG_20120619_223036.jpg

Only things left at this point are to get the timers and watering system set up and then to test it to make sure everything is working. I'll probably monitor the temperature and humidity levels for a couple of days to make sure everything looks good and then I'll have to go pick out a new baby to put in it.:D
 
NorCalAnthony, great project. Very nice look. Good luck on the mist system. You'll knock it out in no time. LOL
 
Once the black base layer had a chance to dry I started using the gray stone textured paint on the whole front trying to spray lighter over the low spots to keep the contrast. Once the gray stone paint was on there I used a little of the brown textured paint to add a little more earthy look to it, just be sure to hold it further away so that it lightly mists the back ground. Here's how it turned out:
View attachment 57490


And here's a shot from the top so you can see the planter boxes and edges a little better. And yes I did drill three drain holes in each planter to allow the excess water to escape. The way the containers are bolted on with the slanted sides flush against the background it forces the water to settle towards the front where I drilled the holes so the water should drip from there without trickling down the wall.
View attachment 57491


Here's all the materials I used in case anyone is thinking about doing this themselves. I didn't picture the styrofoam but I bought a 1/2" x 4' x 8' sheet from Lowes for I think $6 since Michaels wanted $8 for a 1/2" x 2' x 2'...
View attachment 57492

Tomorrow, once everything has had plenty of time to dry, I will put on a couple of coats of the multi-surface sealant to make sure the whole background is sealed and protected. It's 100% acrylic and 100% water proof and since it's made for exterior decks, concrete, etc it should hold up great for this application.

This was my first time doing anything like this but I'm really happy with how it turned out. When I was looking at backgrounds online I found 12" x 24" backgrounds for $15-20/each (I'd have needed two) and this one cost me around $40 in materials and a few hours of my time but it is more original and has a couple of places to add plants. It was really easy but it was also fairly time consuming and requires that you let some of the stuff sit and dry over-night before you can move on to the next step but I'd definitely recommend this to anyone that likes to make things themselves.

I'm stealing the built in cup idea!
 
Nice!!!!!!

Wow... This isn't a cage it's a palace!!! Beautiful job :D

Thanks for the kind words you guys I'm glad you all like it:)

NorCalAnthony, great project. Very nice look. Good luck on the mist system. You'll knock it out in no time. LOL

Thanks but unfortunately the water system will have to be continued tomorrow... Turns out I forgot a couple of the small pieces and got the wrong flow rate drippers. :mad:

I'm stealing the built in cup idea!

Go for it, it will serve you well lol. I'll be sure to give mrfixit some credit since I borrowed and tweaked his idea to make mine.;)
 
Drainage system done

I was able to finish the drainage system today but ran into a couple speed bumps on the watering system so I'll have to continue that part tomorrow after I get off work...


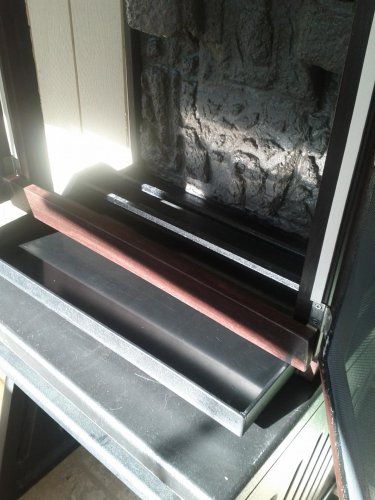
Here's a shot of how my drip tray is removed through the door/flap that I made in the bottom of the front panel. Thanks again robcam for making that sweet drip tray.
IMG_20120619_181355.jpg


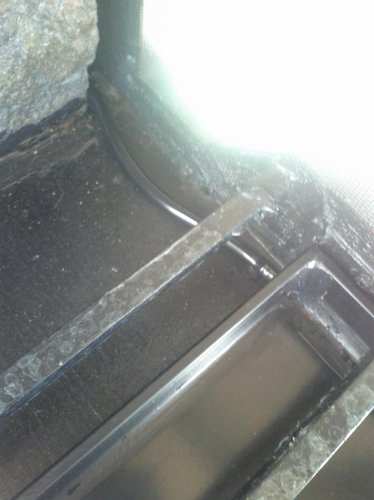
I connected a 1/4" drip line to the barb that I installed on the drip tray and have it ran inside the cage through a small hole at the edge of the fake rock wall. From there the drip line empties into a container under the stand.
IMG_20120619_181527.jpg

I have almost everything done on the watering system (drip and mist) but forgot a couple of connections and got the wrong flow rate drip nozzles so I'll have to finish that part up tomorrow and then post some pics of it. So far it's looking pretty good and I'll have both drip and mist systems done for a little less than $90.
 
Rob, Your drainage trays are fantastic. If you can build them fast and cheap enough I'm sure more than a few of us on here would love to buy them. Have you seen the pre-formed flimsy substrate trays available? I'd much rather buy one like yours!

thanks dan. If trays are needed pm me and ill see what i can do!
 
Done at Last!

Alright so today I was able to finish the misting/dripping system and get it all set up in the cage to completely finish off my build.:D The misting system actually works so well on it's own that I'm thinking I'm going to do away with the drip system and just do several short misting sessions (1 minute intervals every 2 hours)... Anywho here's some pics of everything:


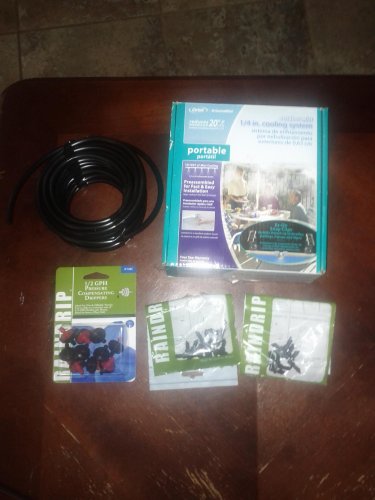
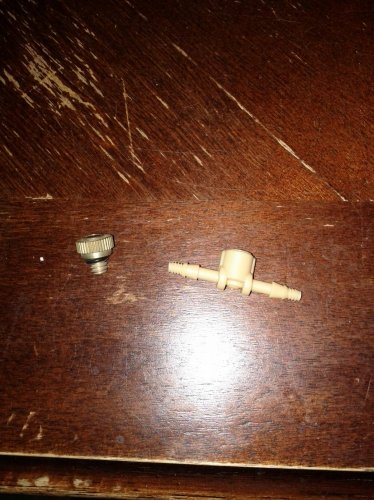
Here are the supplies that I used and the prices in case anyone wants to know how much this would be versus a pre-made one. 50' of 1/4" drip line ($4), 1/2 GPH self regulating drip nozzles ($5), 1/4" T's ($2), 1/4" elbows ($2), and the crowning jewel of the set up was a 1/4" portable misting system made for misting patios in hot weather ($13). Not shown are the 400 and 800 GPH Active Aqua submersible pumps that I got for $55. Even though I bought the smallest packs available I still have enough materials left over to make a duplicate system and feed it off the existing pumps which is nice because I might be adding another cham and cage later on. So the system that runs both drip and misting would be around $91 and if you were to only do the misting system it would only be around $65.
IMG_20120621_164444.jpg

Here is a close up of the misting nozzles that came in the kit I got from Home Depot. They attach in-line and work WAY better than the other misting nozzles that I tried from Lowes and the local nursery that weren't attomizing well enough for this application. These ones actually attomize the water really well and don't require that much pressure to get the job done.
IMG_20120621_182154.jpg

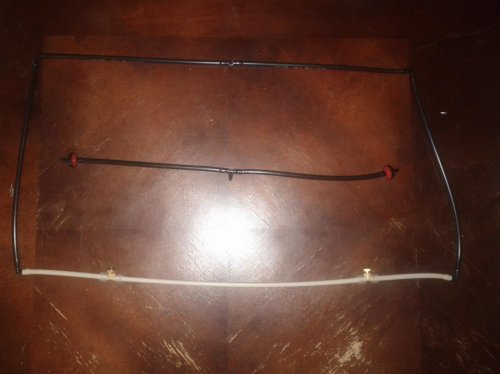
For the misting system I made a closed loop set up with the misting nozzles running across the front, elbows at the corners, and a T centered in the back to connect to the feeder hose. For the drip system I simply had a T that branched off and fed two drip nozzles that are roughly centered above the two pothos that are in the fake rock background.
IMG_20120621_164618.jpg


Here's a shot of the back with everything set up. I used screw-in cable keepers to secure the water lines and then have everything fed in through the hole in the TV stand.
IMG_20120621_172127.jpg


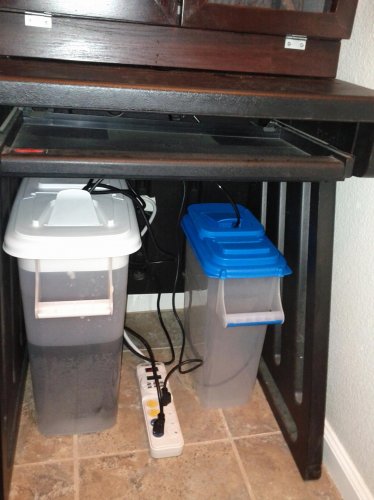
Here's a shot from the front that shows the container I used to house and feed the pumps as well as the smaller container for the excess water run off. They're food containers that won't leach anything and have flaps built in the lids to pour stuff from that worked perfectly for running cables and water lines through. I bought them as part of a 5 piece set for $18 and gave the others to my wife lol. I have the pumps are plugged in to a Zilla surge protector with built in digital timers that will run everything for me.
IMG_20120621_184330.jpg


The misting system I made wound up working a lot better than I thought it would and between the three nozzles it covered pretty much the whole cage so I had to adjust them a little so they were hitting the plants and back wall. The drip system also worked but the nozzles were dripping a lot more than I wanted, even with the lowest flow rate I could find. I could probably down size the pump a little but then I'd run the risk of it not being strong enough to pump the water high enough to reach the top of the cage. Like I said earlier I'm thinking that I'll just return the drip system pump and nozzles and simply run the misting system every two hours for a minute which will provide plenty of water and maintain the humidity. Hopefully without drowning the plants lol.
 
Alright so today I was able to finish the misting/dripping system and get it all set up in the cage to completely finish off my build.:D The misting system actually works so well on it's own that I'm thinking I'm going to do away with the drip system and just do several short misting sessions (1 minute intervals every 2 hours)... Anywho here's some pics of everything:


Here are the supplies that I used and the prices in case anyone wants to know how much this would be versus a pre-made one. 50' of 1/4" drip line ($4), 1/2 GPH self regulating drip nozzles ($5), 1/4" T's ($2), 1/4" elbows ($2), and the crowning jewel of the set up was a 1/4" portable misting system made for misting patios in hot weather ($13). Not shown are the 400 and 800 GPH Active Aqua submersible pumps that I got for $55. Even though I bought the smallest packs available I still have enough materials left over to make a duplicate system and feed it off the existing pumps which is nice because I might be adding another cham and cage later on. So the system that runs both drip and misting would be around $91 and if you were to only do the misting system it would only be around $65.
View attachment 58196

Here is a close up of the misting nozzles that came in the kit I got from Home Depot. They attach in-line and work WAY better than the other misting nozzles that I tried from Lowes and the local nursery that weren't attomizing well enough for this application. These ones actually attomize the water really well and don't require that much pressure to get the job done.
View attachment 58198

For the misting system I made a closed loop set up with the misting nozzles running across the front, elbows at the corners, and a T centered in the back to connect to the feeder hose. For the drip system I simply had a T that branched off and fed two drip nozzles that are roughly centered above the two pothos that are in the fake rock background.
View attachment 58197


Here's a shot of the back with everything set up. I used screw-in cable keepers to secure the water lines and then have everything fed in through the hole in the TV stand.
View attachment 58199


Here's a shot from the front that shows the container I used to house and feed the pumps as well as the smaller container for the excess water run off. They're food containers that won't leach anything and have flaps built in the lids to pour stuff from that worked perfectly for running cables and water lines through. I bought them as part of a 5 piece set for $18 and gave the others to my wife lol. I have the pumps are plugged in to a Zilla surge protector with built in digital timers that will run everything for me.
View attachment 58200


The misting system I made wound up working a lot better than I thought it would and between the three nozzles it covered pretty much the whole cage so I had to adjust them a little so they were hitting the plants and back wall. The drip system also worked but the nozzles were dripping a lot more than I wanted, even with the lowest flow rate I could find. I could probably down size the pump a little but then I'd run the risk of it not being strong enough to pump the water high enough to reach the top of the cage. Like I said earlier I'm thinking that I'll just return the drip system pump and nozzles and simply run the misting system every two hours for a minute which will provide plenty of water and maintain the humidity. Hopefully without drowning the plants lol.

You sir are what one would call a f°°king beast!!! I think you have a calling, the attention to detail and work put in shows throughout the build and iv loved reading and seeing it come together.
I think its time for me to plan my build soon although I'll need it a fair size bigger I'll be using a few ideas from yourself and hope it comes together half as good as yours has :D


i dont suppose you have any vids of your watering system in action? what pump did you use to mist? ty
 
You sir are what one would call a f°°king beast!!! I think you have a calling, the attention to detail and work put in shows throughout the build and iv loved reading and seeing it come together.
I think its time for me to plan my build soon although I'll need it a fair size bigger I'll be using a few ideas from yourself and hope it comes together half as good as yours has :D

Thanks I think lol. This was my first cage build and since I'm going to be getting a baby to put in it I wanted to start with a smaller cage plus this was also a kind of trial run for when I make the much bigger adult size cage. It turned out really nice but I definitely had my share of oops moments lol. I'm glad I could give you some ideas to use and trust me, if you have the time, patience, and basic skills you can definitely do something like this. Although having more experience and maybe the proper power tools would definitely make it easier.;)
 
Do you have any pics / video of your mister you've made and how u did it?

In the last set of pictures I posted I showed the stuff I used and how I set it up. Here's a pic from the side that shows the water line and the misting nozzles that run along the top corner of the cage but you really can't see the mist coming out too well.
IMG_20120622_182430.jpg

I didn't make a video as I was building it but if you want I can try to make one tonight for you that will at least show how it's set up.
 
In the last set of pictures I posted I showed the stuff I used and how I set it up. Here's a pic from the side that shows the water line and the misting nozzles that run along the top corner of the cage but you really can't see the mist coming out too well.
View attachment 58258

I didn't make a video as I was building it but if you want I can try to make one tonight for you that will at least show how it's set up.

That would b awesome if you could, not sure what type of pump I need for a mister setup
 
That would b awesome if you could, not sure what type of pump I need for a mister setup

Don't want to be repetitive, but here's the quick video I just uploaded from this morning of my system. It sounds loud but it really isn't at all. We can be a couple of feet from it and talk, watch tv, etc. with no problem at all. A double or triple diaphragm pump may be quieter but they're also more expensive. I can live with a little noise several minutes each day for half the money! LOL :cool:
http://www.youtube.com/watch?v=2-JmsDJnL3c&feature=youtu.be

Yeh just watched it from the other thread, neat setup
How much did it cost to build the complete mist setup?
need to build Boris a full cage and set up soon :)
 
Yeh just watched it from the other thread, neat setup
How much did it cost to build the complete mist setup?
need to build Boris a full cage and set up soon :)

Just guessing from what I remember, about $60 total. And that's with a bunch of parts, tubing, etc. left over.
 
Thanks I think lol. This was my first cage build and since I'm going to be getting a baby to put in it I wanted to start with a smaller cage plus this was also a kind of trial run for when I make the much bigger adult size cage. It turned out really nice but I definitely had my share of oops moments lol. I'm glad I could give you some ideas to use and trust me, if you have the time, patience, and basic skills you can definitely do something like this. Although having more experience and maybe the proper power tools would definitely make it easier.;)

Ha, Amen Brother! Talk about not having proper power tools. Past a hammer, screw driver, and hack saw I feel your pain...ok, so I bought some disposable paint brushes and have an ancient electric drill! ;)
 
That would b awesome if you could, not sure what type of pump I need for a mister setup

Alright I just got done shooting the video and uploading it to youtube. I should probably apologize in advance since it was done with a cell phone and it was my first attempt at narrating a video like this lol. Anywho here's the link to the video: http://www.youtube.com/watch?v=ljVeb-9kdgI&feature=youtu.be. Let me know if you still have any questions, I'll be happy to help with what I can.
 
I'm just thinking in America it OK for you lot, everything's way cheaper!! If I bought a pump and timer and all the plumbing I think it would cost the same if not more than a mistking? I'll look into it abit more though as its something I need to figure out for the cage design
But great work both of you :D:thumbup:
 
Back
Top Bottom