New habitat, any constructive criticism is appreciated.

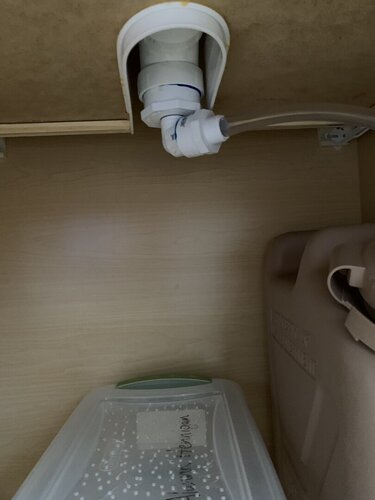
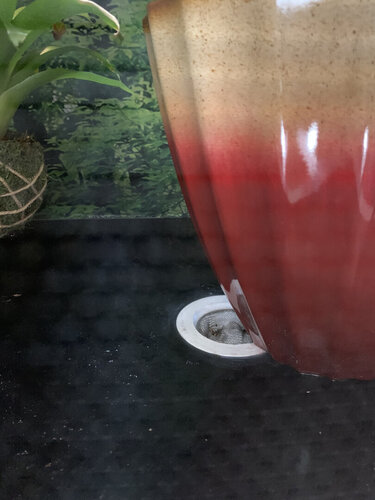
We bought a kitchen cabinet to go under the habitat, my husband cut the drawer and glued on a plastic strip to keep the integrity of the drawer and made a drain out of a shower drain running down into a water container with a water sensor detector glued/siliconed onto it, so it’ll let us know on our phones when it’s half full.
Do u have pics on how u made the cabinet drain? I'd like to do one for my cham
 
Do u have pics on how u made the cabinet drain? I'd like to do one for my cham
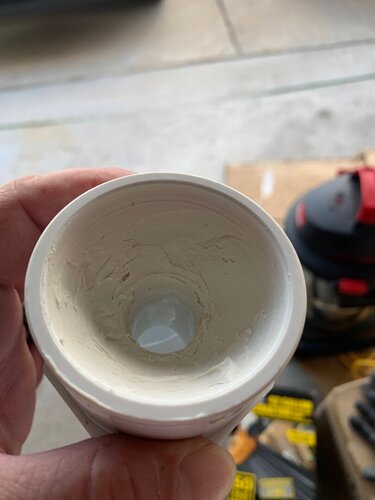
Here’s some of the build pictures and finished product. My husband has some better pictures that I can post later when he is available. They can show you more of a step-by-step of what we did. But we started by buying a plain white kitchen cabinet from Lowe’s-$144., it did not come with the top. There were cheaper ones that you can stain/paint, we just wanted the white one. We bought a desk top from ikea for about $30.00 then cut it in half, put a 3 inch hole in the center and filled in the parts we cut with great stuff and sealed with silicone. Unfortunately ikea makes their desk tops etc.... with cardboard support in the center, rather than a full piece of wood(guess that’s why it was so cheap)lol. And since it was really long, we can use the other half for another habitat. There’s a picture of a piece of plumbing that we used for the drain pipe, we had to fill it in with waterproof silicone so it would flow straight through the hole rather than get built up inside the pipe(since the plumbing piece had nooks inside.) I’m sure there are better ways to do it, that is what we came up with though.
We also got a shower drain for the actual drain in the habitat, I think he changed out the top of it though because the shower drain had larger holes and would of let bugs get into the water can. So he bought a metal hair drain cover from Lowe’s and siliconed that to the drain. I’ll post better pictures of what he did to make the drain etc later. But this can kind of give you an idea at least for now. Hopefully I didn’t make it too confusing. It really was pretty easy once we got all the right pieces.
 

Attachments

  • ABAA35B9-6475-48F3-9017-BE529C612861.jpeg
    ABAA35B9-6475-48F3-9017-BE529C612861.jpeg
    84.1 KB · Views: 85
  • B6E71A53-09A7-46F7-983C-8B2CF25163F2.jpeg
    B6E71A53-09A7-46F7-983C-8B2CF25163F2.jpeg
    70.5 KB · Views: 92
  • E7507567-6D42-418B-A67B-63BDA4B1A4F7.jpeg
    E7507567-6D42-418B-A67B-63BDA4B1A4F7.jpeg
    104.5 KB · Views: 83
  • 34BE4169-912C-4D5F-9C60-2D208BD2ECD0.jpeg
    34BE4169-912C-4D5F-9C60-2D208BD2ECD0.jpeg
    125.8 KB · Views: 87
  • C89E592C-23C9-4020-B16C-ECA2AB180626.jpeg
    C89E592C-23C9-4020-B16C-ECA2AB180626.jpeg
    80.9 KB · Views: 85
  • B95D4D8D-064D-4E9E-9950-5F1A74DE51D3.jpeg
    B95D4D8D-064D-4E9E-9950-5F1A74DE51D3.jpeg
    131.8 KB · Views: 94
  • E02ACD8F-6390-4034-AEED-3051A8C4105D.jpeg
    E02ACD8F-6390-4034-AEED-3051A8C4105D.jpeg
    87.8 KB · Views: 82
  • 21F2EE80-3A6D-433A-A5E0-901E623A8C83.jpeg
    21F2EE80-3A6D-433A-A5E0-901E623A8C83.jpeg
    168.8 KB · Views: 87
  • 6B31A457-53CB-4694-A459-A152538570D9.jpeg
    6B31A457-53CB-4694-A459-A152538570D9.jpeg
    84.5 KB · Views: 88
  • F8B80B3E-B658-42A1-A4EC-A71773D82B8E.jpeg
    F8B80B3E-B658-42A1-A4EC-A71773D82B8E.jpeg
    129.3 KB · Views: 89
We got the water can from Grainger for $25.00. It’s thin and tall so we still have space in the cabinet for other things. It was about half the price of all the other ones online. I think Amazon was selling them for about $50.00. He also got a Samsung water sensor that notifies our phone when the water reaches the sensors level. Basically he just cut a small hole big enough for the sensor prongs to make contact with the water, then siliconed it and hot glued around the outside of it to seal it to the water tank.
 
We also siliconed the edges of where the background connects to each other and to the floor.
 
What type of plant light would you recommend?
Jungle Dawn spots are awesome and more affordable than a full linear light by them. I got mine from Lightyourreptile.com
It has made my hibiscus keep blooming and all my plants happy and green.
 
I have it right on the screen. It doesn’t get hot so I set it there. My hibiscus is what I’m trying to get the most with it and it’s down at the bottom so I aim that way but it fills the enclosure.
 
Got a couple of really good pictures of him chillin on his bromeliad a couple of days ago. he was enjoying his view from the top, lol.
 

Attachments

  • F7FF1410-ED22-4052-8BF6-BC29C2E23D44.jpeg
    F7FF1410-ED22-4052-8BF6-BC29C2E23D44.jpeg
    170.3 KB · Views: 90
  • 6B005CB6-F905-4DB4-B77D-9694652F3877.jpeg
    6B005CB6-F905-4DB4-B77D-9694652F3877.jpeg
    219.3 KB · Views: 98
  • EF979BB3-A551-4583-A2F7-8C80C6932087.jpeg
    EF979BB3-A551-4583-A2F7-8C80C6932087.jpeg
    146.9 KB · Views: 81
He’s huge!! Seems to have picked out his permanent colors. Wonderful appetite
 

Attachments

  • C35825E3-F150-40DA-87AA-A942C86A24EA.jpeg
    C35825E3-F150-40DA-87AA-A942C86A24EA.jpeg
    212.5 KB · Views: 86
  • 222543F3-3A78-45BC-B963-1222278780BB.jpeg
    222543F3-3A78-45BC-B963-1222278780BB.jpeg
    197.5 KB · Views: 80
We lived setting up ours, just try to fill it up as much as you can, you can never be overly full, unless it’s to the point the Cham couldn’t move
 

Attachments

  • ECED9A92-32AE-496C-B7F5-B5A9E0F96B80.jpeg
    ECED9A92-32AE-496C-B7F5-B5A9E0F96B80.jpeg
    241.2 KB · Views: 78
  • FD8C2215-BBD0-406F-A68F-2BBBC6D06D88.jpeg
    FD8C2215-BBD0-406F-A68F-2BBBC6D06D88.jpeg
    188.6 KB · Views: 82
  • CB5426E2-F979-4DB7-90A9-AB54BC9F1AD9.jpeg
    CB5426E2-F979-4DB7-90A9-AB54BC9F1AD9.jpeg
    171.4 KB · Views: 74
Back
Top Bottom