Rack or stand?

Delef3

Member
Greetings everyone!
Aside from my intro yesterday, this is my first public post on here in over 15 years! Great to be back!
I am getting all my supplies together for my future new panther and I am having a dilemma I’d like some advice on. My coming enclosure will be 2x4x4. I am trying to decide whether to get a stand with two shelves or a full rack which the enclosure will sit inside of. There are pluses and minuses to each option in my opinion, but I just cannot convince myself of either one. I like the mobility of a full rack on casters, and the option of hanging wire baskets for a flogger etc., not to mention having all the fixtures etc. off the top of the enclosure, but a smaller stand will be cheaper and take up less space (kind of). I’ve looked at a LOT of options and really like the Husky type racks/shelves, but there are so many others as well. In the end, the decision will obviously affect my placement of UVB/LED bar/heat source, etc. so I need to figure this out so I can do the math and have enough space up top either way. It would also determine whether I get the 6% or 12% Arcadia bulb because placement will be higher on the full rack obviously. I’m aware that this is just one step in this beginning process, but I wanted to get another set of opinions before I pull the trigger either way. Thanks so much in advance!
 
Thanks for the reply. I feel the same way. My last Cham enclosure was on top of a cabinet that I fixed a larger sink on top of, and which drained through a pipe into a bucket hidden behind the doors. I just want to go simpler this time. I actually found a company that sells insert plastic sliding doors that are made to be used with the wire shelving units readily available. That is another option. I may also look at TV stands. Good idea.
 
I use heavy duty shelving like these. https://www.homedepot.com/p/Muscle-...pip_alternatives-_-207135132-_-305553565-_-N& However, I have been creating double sized enclosures for all of my chameleons which are bioactive, so I need the length and ability to hold the immense weight. If you have the space for it, it’s fantastic to give your chameleon a double wide. My males use all of the space on their patrols. :) https://chameleonacademy.com/double-wide-chameleon-cage-project/
Thanks for the reply! This is one of the units I have looked at. But I dont know how I feel about the composite shelf material. Have you had any issues with that re: water? I was looking to probably get all metal/wire if I go this route. My enclosure will be 48 high, 48 wide, and 24 deep. Is there enough width between the vertical posts to fit in a 48" wide shelf? Im finding that many options will not work because of the inner dimensions.
 
Thanks for the reply! This is one of the units I have looked at. But I dont know how I feel about the composite shelf material. Have you had any issues with that re: water? I was looking to probably get all metal/wire if I go this route. My enclosure will be 48 high, 48 wide, and 24 deep. Is there enough width between the vertical posts to fit in a 48" wide shelf? Im finding that many options will not work because of the inner dimensions.
I’ve covered the shelf with plastic sheeting and tarp, but when I took down some enclosures, I found that there had been some leak thru. The shelf warped a little bit, but is still usable to put another heavy enclosure on. Everything fits perfectly between the posts, but it is a snug fit. For combining two enclosures I had to take varied measures to make sure the screw heads were flush or recessed if able for a mm or two for a better fit. I had bought a wire shelf which appeared to be the equivalent. However, it was a touch smaller and wouldn’t fit the double enclosure. Plus, as I was trying to see if they would fit, they kept sliding off and to the floor, which broke the enclosures. It fits my 4’ long Zen enclosure for my beardie, but that does slide a bit if I’m not careful.
 
I decided to make a note to bring a tape measure with me to check internal dimensions on all units since most stores have display units. As a side note, for this large atrium type enclosure, with which I will have three mounts for mistaking nozzles, should I get two additional double nozzles in addition to the one single that the system comes with, or is that overkill?
 
I use two double headed nozzles for each double enclosure. I used to put them in the back, but it was so very hard for me if one needed to be replaced. I now have them all in the front, and while easy to reach, it’s not the ideal spot. For me I think the ideal would be to place a double nozzle on each side and a double nozzle in the middle where the two enclosures meet.
 
So I will not be joining two enclosures. It will be one enclosure with three included hydration mounts. I was planning three double nozzles: one on each side and one in the front middle. I just want to make sure it is not overkill since I’d need to order the extra nozzles and fittings.
 
So I will not be joining two enclosures. It will be one enclosure with three included hydration mounts. I was planning three double nozzles: one on each side and one in the front middle. I just want to make sure it is not overkill since I’d need to order the extra nozzles and fittings.
It depends on the width of your enclosure. If it only 2’ wide, that is a lot. The two doubles on the sides would be enough.
 
3 would work well in an atrium one on each side and one towards the middle. Watch your placement though you do not want your lights sitting over the nozzles or the tubing. It will heat them up. So if your lights are directly on the cage top this would be a concern if you are raising on a rack you would be good.
 
3 would work well in an atrium one on each side and one towards the middle. Watch your placement though you do not want your lights sitting over the nozzles or the tubing. It will heat them up. So if your lights are directly on the cage top this would be a concern if you are raising on a rack you would be good.
That makes a lot of sense. I’ll be raising the fixtures some inches above the enclosure for sure. I just found a 60” wide 24” deep 77” high wire shelving rack on wayfair for a competitive price and snagged it. Hopefully my drainage pipe will be able to fit through the wire spacing. Question about the Mistking details: In addition to the one nozzle it comes with, would I then add on two double nozzles, one T fitting and an extra 90 degree fitting? Would there be anything else I am not thinking of for that? Thanks!!
 
That makes a lot of sense. I’ll be raising the fixtures some inches above the enclosure for sure. I just found a 60” wide 24” deep 77” high wire shelving rack on wayfair for a competitive price and snagged it. Hopefully my drainage pipe will be able to fit through the wire spacing. Question about the Mistking details: In addition to the one nozzle it comes with, would I then add on two double nozzles, one T fitting and an extra 90 degree fitting? Would there be anything else I am not thinking of for that? Thanks!!
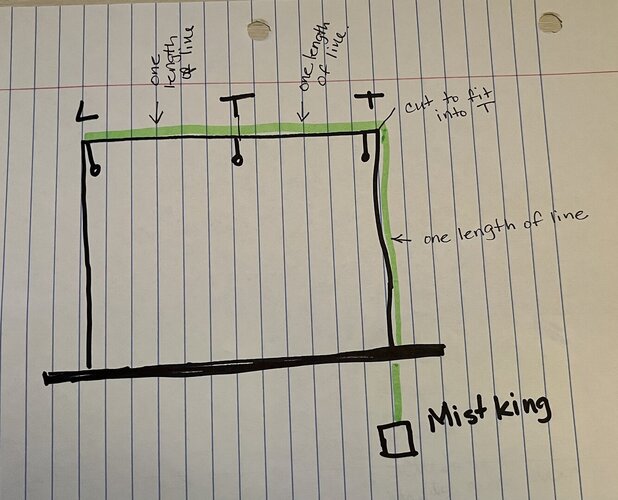
So I tend to go with a very clean set up installing the mistking line. I cut my pieces so that I have one solid piece going from the actual mistking to the first nozzel. Then I have the additional pieces cut to fit that section. Keep in mind with the nozzles you have to push the line into it and then pull back to make sure it is secure. So push in and then stretch out to the next nozzle give yourself about a half inch overlap on the T before you cut that section to make sure you have enough that it fits in right. You can always trim a bit more off if needed. I do this first then I use the cage hooks to secure the line all the way up the side from the machine to the cage and running along the top. You will do this into the frame of your cage.

You will need 3 nozzles. 1 with an L to end the line and then two with a T. T flows in from one side and out the other the L top only flows in from one side then ends. I buy all my extra parts from Josh's frogs. You want to make sure you have enough wedges as well. I do not remember how many the atrium comes with so you may need to buy an additional. You are buying 1/4 inch parts so it fits your tube line. You can get extra line if you need it too. I get a few extra elbows as well. I do not like my line to have weird bowing to it when I come up the side of the cage. Depending on your position of your nozzles these can really help for a cleaner attachment.

https://joshsfrogs.com/search?query=mistking

I am a visual learner so this may help more than me explaining. This would be if you are running them all across the back or front of the cage. If your pulling the nozzles up on the middle of the sides it would look a little different. You would need to have two L nozzles on the sides and have the tube run up the back corner then use another T direct to 3 tubes. One from up the back corner one down one side of the cage to a nozzle ending in an L top and then the other running along the other edge of the cage to the middle nozzle using a T top so it can continue to the last one that ends in a L

IMG_8781.jpeg

Any time you see plug in attachments those can not plug into the tube those plug into other attachment pieces or the nozzle itself. I recommend getting the cutter for the tubing it will give you very clean straight cuts without bending the tube.

Hope this makes sense.
 
So I tend to go with a very clean set up installing the mistking line. I cut my pieces so that I have one solid piece going from the actual mistking to the first nozzel. Then I have the additional pieces cut to fit that section. Keep in mind with the nozzles you have to push the line into it and then pull back to make sure it is secure. So push in and then stretch out to the next nozzle give yourself about a half inch overlap on the T before you cut that section to make sure you have enough that it fits in right. You can always trim a bit more off if needed. I do this first then I use the cage hooks to secure the line all the way up the side from the machine to the cage and running along the top. You will do this into the frame of your cage.

You will need 3 nozzles. 1 with an L to end the line and then two with a T. T flows in from one side and out the other the L top only flows in from one side then ends. I buy all my extra parts from Josh's frogs. You want to make sure you have enough wedges as well. I do not remember how many the atrium comes with so you may need to buy an additional. You are buying 1/4 inch parts so it fits your tube line. You can get extra line if you need it too. I get a few extra elbows as well. I do not like my line to have weird bowing to it when I come up the side of the cage. Depending on your position of your nozzles these can really help for a cleaner attachment.

https://joshsfrogs.com/search?query=mistking

I am a visual learner so this may help more than me explaining. This would be if you are running them all across the back or front of the cage. If your pulling the nozzles up on the middle of the sides it would look a little different. You would need to have two L nozzles on the sides and have the tube run up the back corner then use another T direct to 3 tubes. One from up the back corner one down one side of the cage to a nozzle ending in an L top and then the other running along the other edge of the cage to the middle nozzle using a T top so it can continue to the last one that ends in a L

View attachment 354484

Any time you see plug in attachments those can not plug into the tube those plug into other attachment pieces or the nozzle itself. I recommend getting the cutter for the tubing it will give you very clean straight cuts without bending the tube.

Hope this makes sense.
Wow. Thank you so much. I am a visual learner as well (fine arts background) and this drawing helps a lot in, addition to the great info. I had a Mistking years ago and this is helping to jog my memory about installation and parts. I prefer a “clean set up” as well. What do you mean by “cage hooks”? Are those extra parts I can order? Also, this double nozzle seems to have the “T fitting” attached: https://joshsfrogs.com/sp/mistking-value-t-double-misting-assembly-mk00021. So if I bought two of those, wouldn’t I just need to purchase one “L fitting” (aside from potential extras)? I also was hoping to utilize the included single nozzle on the front side of the enclosure (the two doubles on the two sides). So that would necessitate getting a “T fitting” for the single nozzle and using the elbow fitting for the end of the chain. Hopefully you can switch out the T fitting that comes with the double nozzle in the link for an elbow fitting and use the T fitting from that on the single nozzle. Unless they are not removable?
 
Last edited:
I just went over the link again and I think I answered my own question. about the possibility of removing the fittings from the assemblies. Doesn’t look like you can. So…. In this size enclosure, would it be ok to have two single nozzles on the two sides and a double on the front side of the enclosure or do I need to get three double nozzles?
 
So when I had my big one I had singles on the sides. issue with breaking a double apart into singles is your missing pieces you need so you would need to order those pieces. Double in the middle can be nice and provide extra coverage.

These are the tube clips that you would screw into your frame. runs your tube up against the cage and reduces the vibrations from the system when it runs https://joshsfrogs.com/sp/mistking-tubing-clips-10-pack-mk00022
Oh man. I just place the order two hours ago and ordered three sets of double nozzles. This is what I was asking about above. Is it overkill? I guess I’m stuck with them now. 😂
 
Back
Top Bottom