Help/feedback on a huge enclosure I’m making

Small update for the learning curve!

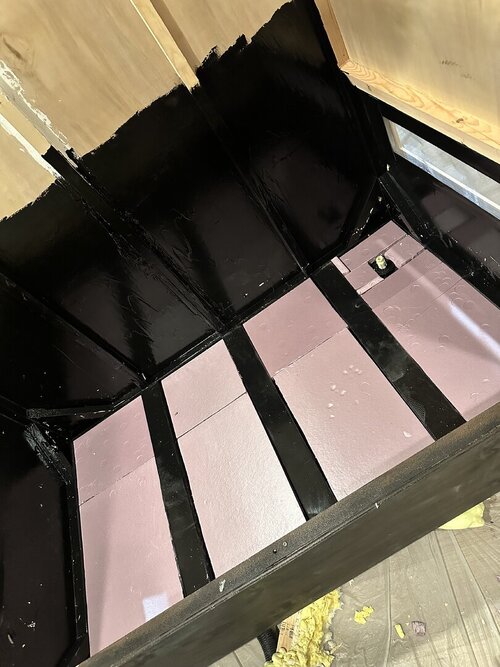
I tried to use a plywood board at a tilt (supported by 2x4 cuts) with some spray insulation foam for the drainage slant and realized I didn’t like how much enclosure space that cost me. I ended up ripping it all out today and decided to lay down some foam panels to level out the structural gaps in the bottom. Ignore the white pvc stump in the bulkhead, it’s getting removed shortly since it’s unnecessary now. I’m thinking of using lightweight leveling compound or mortar to build a thin slope toward the bulkhead drain but worried about the weight that might add on. I’d assume if it’s thin enough it wouldn’t be a problem but I’m no professional so if anyone can weigh in on that idea, I’d appreciate it!

For the vents, I stapled aluminum screen tightly to the inside and used gorilla waterproof sealing tape to cover the edges and frame it before I seal it again after the drainage is set. I used my miter saw to cut frames for the outer vents and will stain them tomorrow.

I can’t tell if I’m gaining or losing weight from this project. Will post more updates soon :)
 

Attachments

  • IMG_8186.jpeg
    IMG_8186.jpeg
    156.2 KB · Views: 11
Small update for the learning curve!

I tried to use a plywood board at a tilt (supported by 2x4 cuts) with some spray insulation foam for the drainage slant and realized I didn’t like how much enclosure space that cost me. I ended up ripping it all out today and decided to lay down some foam panels to level out the structural gaps in the bottom. Ignore the white pvc stump in the bulkhead, it’s getting removed shortly since it’s unnecessary now. I’m thinking of using lightweight leveling compound or mortar to build a thin slope toward the bulkhead drain but worried about the weight that might add on. I’d assume if it’s thin enough it wouldn’t be a problem but I’m no professional so if anyone can weigh in on that idea, I’d appreciate it!

For the vents, I stapled aluminum screen tightly to the inside and used gorilla waterproof sealing tape to cover the edges and frame it before I seal it again after the drainage is set. I used my miter saw to cut frames for the outer vents and will stain them tomorrow.

I can’t tell if I’m gaining or losing weight from this project. Will post more updates soon :)
Hi, diy chameleon guys have a great tutorial on the chameleon academy youtube channel about building a drainage layer. You can use plastic corrugate board for the bottom and silicone seal the border. Check out rhe video. Really helpful.
 
Hi, diy chameleon guys have a great tutorial on the chameleon academy youtube channel about building a drainage layer. You can use plastic corrugate board for the bottom and silicone seal the border. Check out rhe video. Really helpful.
I’ll check it out now! Thank you so much!
 
We have been out of state visiting family but I thought I’d make a quick update while I wait for the next round to flex seal to dry.

Due to the 2x4s breaking up the bottom, figuring out the drainage was tough. I ultimately decided to install 2 drain valves instead of just 1. I used foam board to fill the gaps between the 2x4 braces and added an additional “plateau” of foam in the center to help the excess water slope into the 2 drain areas. I used quikrete to fill the gaps and create additional slope where necessary. Now I’m putting a couple layers of flex seal on top of everything leading down to the bulkheads/drains.

It’s a lot of trial and error and it isn’t the prettiest thing out there, but it’s my first try at building anything or doing any of this so I’m stoked! Hoping my little guy will love his new home when it’s done. :)

IMG_8327.jpeg
 
This might be a dumb ask but does anyone know if there’s any evidence to support whether or not chameleons prefer printed image backdrops (open forests, etc to give the illusion of more space) or closed sculpted foam ones? I want this to be the ultimate environment for my panther. Thanks!
 
IMG_8465.jpeg


Got the top left screen on (ran out of aluminum by like 2” so I’ll pick some up tomorrow after work), used flex seal paste over flex seal tape to patch cracks/openings and apply drainage screens so material stuff doesn’t go down into the valves. I got some Pond & Stone and used that to fill a few areas, mostly testing that out right now and seeing where I want to go with it. I also applied flex seal liquid to the top braces under the vent so moisture isn’t as much of a problem up top.

I ordered mist king wedges (x4) that I’ll be placing in each screened corner when they get here tomorrow. The plan is to apply one final coat of flex seal liquid to the bottom and then let that cure to finish off the base of the drainage setup.

Lots of work, lots more to go!
 
It will be amazing👌🏻😎 please hurry up can’t wait to see the end result 😜😋
You and me both! I just put in more pond and stone foam and it looks like I’ll need 10 more cans. Hopefully the water test will go well tomorrow and this can get wrapped up soon!
 
Water test went well! Found an overlooked spot in the front floor area so I just applied flex seal paste to patch that up. Love that stuff!

The drains are taking the water properly! I’ve noticed the valves themselves seem to have small leaks and that’s probably from me forgetting to use teflon tape to properly seal them. No leaks around the bulkheads themselves though. About to fix those and I got the rest of the foam and other screen in too. Finally getting somewhere!
 
IMG_8552.jpeg

The water tests are successful and drains work properly with no leaks! I’ve moved on to carving the foam with a wire brush drill bit and it is insane how much of a mess this process creates. It works quickly and effectively so it’s totally worth it but I cannot overstate how much of a mess it is. 😭😂

Thanks for following along with the build, I’m so glad I’m able to share it with you guys! I can see myself getting very addicted to this despite the headaches of making a giant enclosure! :)
 
View attachment 360988
The water tests are successful and drains work properly with no leaks! I’ve moved on to carving the foam with a wire brush drill bit and it is insane how much of a mess this process creates. It works quickly and effectively so it’s totally worth it but I cannot overstate how much of a mess it is. 😭😂

Thanks for following along with the build, I’m so glad I’m able to share it with you guys! I can see myself getting very addicted to this despite the headaches of making a giant enclosure! :)
Ok how many cans of foam 🤪😂 you’re doing a great job. I really hope you never have to move this cage out of the house 🫣
 
Back
Top Bottom