Need help with draining system asap!

Unfortunately they don't have anything to fit the dimensions of my enclosure. It is 3' wide and 2' deep
You probably won't find anything exactly the size you want...but bigger would work, right?

When thinking about a future cham cage, figure out what you'll use for the bottom tray first and then settle the dimensions of the cage to fit it. Kind of like making your own Christmas cards. First hard learned lesson is to find the envelopes you want and design the card to fit them not the other way around.
 
If you are planning ahead, look for hydroponics flood table trays. Larger sized ABS plastic trays that can be ordered with drains installed. And, they'll work with available drain and pipe fittings. They are rigid and hold a lot of weight.
I've used the hydroponic trays in the past, what I like about the plastic sheet is it's cheap and disposable, so every 6 months or so I just pull the plastic and install new sheet = no cleaning.
Anything involved in the system with a rigid surface eventually becomes filthy with droppings and stains, I'm lazy and hate scrubbing :)
 
Ok. So due to some really unfortunate events I know have all the time in the world to work on one of my cages. I'm still not sure what route I want to take with this so I will continue to look on the site ( enclosure and supply has a drainage sticky) I do like the planter bottom but not sure of how well it will actually work
 
You really only need one screen to separate the bioballs from everything else. That way the water is the only thing going onto the bioballs and drans more cleanly. I don't believe the charcoal is necessary either, it's debatable if it really does any good.
 
If you see your cham is a dirt eater make sure you cover it with baby tears, live moss, or something large enough that your cham can't eat. Just incase of impaction.
 
Ok. I like this idea.

A little idea I developed while trying to keep 12 leaf frog terrariums clean. When using layers of substrate including expanded clay Leica balls, charcoal, pumice, bark or whatever, don't just lay the materials loose in the cage bottom with a piece of screen between them, make flat bags for each layer out of fiberglass window screen that matches the dimensions of your cage floor and depth you want that layer to be. Kind of like little mattresses. Fill each bag with one substrate and stitch them shut like a pillowcase. Fishing monofilament works great and won't decay. When you decide to break everything down for cleaning you can pick up each layer in one piece, soak, bleach, and rinse them in the sink, and replace them very easily...its a lot faster than scooping the stuff out cup by cup. Also makes it harder for feeders to bury themselves in the substrate, keeps the layers separated, keeps loose pieces from getting picked up on the herp's tongue, but allows the same degree of percolation. The only material this doesn't really work with is loose soil.
 
Last edited:
A little idea I developed while trying to keep 12 leaf frog terrariums clean. When using layers of substrate including expanded clay Leica balls, charcoal, pumice, bark or whatever, don't just lay the materials loose in the cage bottom with a piece of screen between them, make flat bags for each layer out of fiberglass window screen that matches the dimensions of your cage floor and depth you want that layer to be. Kind of like little mattresses. Fill each bag with one substrate and stitch them shut like a pillowcase. Fishing monofilament works great and won't decay. When you decide to break everything down for cleaning you can pick up each layer in one piece, soak, bleach, and rinse them in the sink, and replace them very easily...its a lot faster than scooping the stuff out cup by cup. Also makes it harder for feeders to bury themselves in the substrate, keeps the layers separated, keeps loose pieces from getting picked up on the herp's tongue, but allows the same degree of percolation. The only material this doesn't really work with is loose soil.
Genius! That's a great idea. Now I just need to make the bottom waterproof
 
Genius! That's a great idea. Now I just need to make the bottom waterproof

I found it worked really well once the bags were made up for each terrarium. The easier it is to clean substrate the more often it gets done. Leaf frogs don't burrow and hate getting soil on their skins, so I didn't have to bother with it. I could get all 12 setups broken down, flushed, and re-assembled in a day. If you are not trying to root bigger plants in your cham cage it should work for them too.
 
I think if you replace the wood floor that has been penetrated by water and replace it with new wood (you'll be better off with plywood than particleboard too even if it's not as thick, it will hold weight much better over time) then use a plastic sheet it will be the best cost effective plan for you. You can build your slope with the new wood, place a drain at the bottom of the slope and be done.

If you want to look at my albums, I have an armoire I'm converting currently and I built in a .25" plywood slope that drops .875" over a 22" run which isn't much, but plenty to keep water from standing. I then drilled a hole at the back and used "liquid nails" to glue down a 6 mil plastic sheet that I bought in a roll and cut to size. I think it came in 100 foot rolls, but it was still cheaper than most trays I could find. Anyway, hope that helps, but the biggest thing I saw is that you need to use different wood for your base, that particle board will be impossible to keep from getting saturated and even if there weren't water on/getting into it, it will still sag on you over time with any weight on it.

Good luck!
I like what you have done and the plastic.The armoire looks great! I agree that I should not have used the partical boarded. I used 1/2" ply for the rest of the enclosure. I didn't really think about the water wen making my cage.
 
I like what you have done and the plastic.The armoire looks great! I agree that I should not have used the partical boarded. I used 1/2" ply for the rest of the enclosure. I didn't really think about the water wen making my cage.

Thanks, much appreciated! It did look like you coated the bottom well, I was just trying to be helpful, not harsh. I had a good year of convincing my wife that I could build something that looked good before I could get my guy so I did a lot of reading on here before. haha. And to be honest, since I've taken like 6 months to get that armoire to where it is (not proud of that haha moved real slow and overthought a lot), but taking the extra time helped me plan around a few issues.

Good luck though, makes me happy to see home made enclosures!!!
 
Last edited:
When I was making the cage I had asked a good friend who I thought knew what he was talking about. I asked if I needed to waterproof the wood. He said that as long as I did a lot of coats with the enamel paint I should not have to worried about (WRONG!!!)
 
Thanks, much appreciated! It did look like you coated the bottom well, I was just trying to be helpful, not harsh. I had a good year of convincing my wife that I could build something that looked good before I could get my guy so I did a lot of reading on here before. haha. And to be honest, since I've taken like 6 months to get that armoire to where it is (not proud of that haha moved real slow and overthought a lot), but taking the extra time helped me plan around a few issues.

Good luck though, makes me happy to see home made enclosures!!!
How did you get the plastic so tight on the bottom? Liquid nails takes so.e time to set so what did you use to keep it in place?
 
How did you get the plastic so tight on the bottom? Liquid nails takes so.e time to set so what did you use to keep it in place?
Hey, sorry for the delayed response. The first thing I did was put some heavy flat boxes on the plastic spread on the floor to smooth out the creases and left it for a few days. The liquid nails was actually a pretty thick consistency so I just put it down in beads about 3/8-1/2" wide, spaced about an inch and a half or two apart. In hindsight I would put it closer together (maybe an inch apart), it's worth the extra tube of liquid nails. For mine I cut the plastic to basic shape before and started at the front edge so that would be straight. Then just slowly place it down and smooth out any wrinkles with your hands. I tried to kind of "squeegee" it from from to back with a microfiber towel making sure I didn't pull the front edge away. Also don't press too hard and overstretch the plastic because you can make little "wrinkle bubble." I let the base dry for two days I think. Then I put a ton of liquid nails on the slopes and walls and pressed it into place the same way. It was kind of tricky with uneven surfaces, but I just tried to follow a ridge with the top bead. I let it set for for three days I think before trimming the excess so I wouldn't pull it away from the liquid nails. Good luck, be happy to answer anything I missed.
 
Hey, sorry for the delayed response. The first thing I did was put some heavy flat boxes on the plastic spread on the floor to smooth out the creases and left it for a few days. The liquid nails was actually a pretty thick consistency so I just put it down in beads about 3/8-1/2" wide, spaced about an inch and a half or two apart. In hindsight I would put it closer together (maybe an inch apart), it's worth the extra tube of liquid nails. For mine I cut the plastic to basic shape before and started at the front edge so that would be straight. Then just slowly place it down and smooth out any wrinkles with your hands. I tried to kind of "squeegee" it from from to back with a microfiber towel making sure I didn't pull the front edge away. Also don't press too hard and overstretch the plastic because you can make little "wrinkle bubble." I let the base dry for two days I think. Then I put a ton of liquid nails on the slopes and walls and pressed it into place the same way. It was kind of tricky with uneven surfaces, but I just tried to follow a ridge with the top bead. I let it set for for three days I think before trimming the excess so I wouldn't pull it away from the liquid nails. Good luck, be happy to answer anything I missed.
Thank you!
 
So I have been working on drainage and turning the bottom of the cage waterproof. Today I was looking at the bottom when I realized my rubber maid would fit in the bottom! It needs a little bit of cleaning up and facing it to fit better but it can be done. So now I'm going to get another and fab a bulkhead and drain into it.

Here is a pic
20160202_113934.jpg
 
That's the type of thing so many of us end up using. One suggestion...to keep water from getting down between the wood cage frame the Rubbermaid, I've cut up those foam pipe insulation tubes to make a waterproof lip or curb around the edges of the tub. Angle the foam so it directs droplets into the tub. Looks pretty decent, better than expanding insulation foam anyway.
 
Update on things.

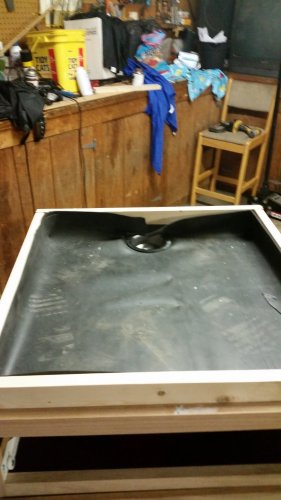
The rubber maid was not working for me so here is what I have been working on. This is only half the bottom of my cage. Once I get both sides completed I will install drains. I'm going to use a non-toxic wood sealer on the surrounding wood that is exposed.
20160210_192217.jpg
 
Looks like you got it underway already but figured I'd post incase you needed other ideas or for others if needed. Basically on the interior top of the cabinet, we cut some supports to help strengthen the floor to hold the plants etc.
The supports were angled to the back slightly to help the water roll back to the sink drain the runs down the pipe into a bucket. We used a rubber to line the floor,the corners we had to cut on the rubber to get it to sit right,which I sealed with aquarium safe sealent. Has held up pretty well (knock on wood) enclosure drains very well. :)
20150816_193500.jpg
20150816_191952.jpg
 

Attachments

  • 20150816_200942.jpg
    20150816_200942.jpg
    150.8 KB · Views: 104
Back
Top Bottom