Forestdellic
New Member
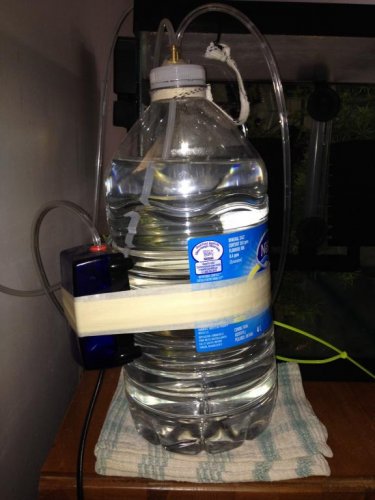
I am not sure where this post belongs but this forum sector seemed appropriate. I wanted to share with you guys and also create a little guide for newbies (like me) who want to make a poor man's dripper system for their chameleons.
There are many methods, mine is just ONE of the many ways you can construct such a system. This literally only costed me 60cents to construct, the rest were just regular old household items I had laying around
I hope this guide serves to some purpose
WARNING; This is NOT an alternative to misting. Kindly do not make the mistake into thinking that this administration of water will make up for humidity. Regular misting, at least twice a day, should still be administered to the chameleons. This guide is only meant to educate and be used as another way of administrating hydration to the animals
So let us begin!
For this project you will need the following;
Instructions;
It's really simple to do. Honestly I used more time walking to the Agricultural store than actually construction this.
I hope this guide helped!
There are many methods, mine is just ONE of the many ways you can construct such a system. This literally only costed me 60cents to construct, the rest were just regular old household items I had laying around
I hope this guide serves to some purpose
WARNING; This is NOT an alternative to misting. Kindly do not make the mistake into thinking that this administration of water will make up for humidity. Regular misting, at least twice a day, should still be administered to the chameleons. This guide is only meant to educate and be used as another way of administrating hydration to the animals
So let us begin!
For this project you will need the following;
- Power Drill
- 3.3cm thick drill bit (tangible)
- Silicone
- Stanely Knife
- Dripper Valve
- PVC pipe lining (aka spaghetti pipe)
- Plastic bottle of water

Instructions;
- The drill bit does not have to be exactly 3.3cm. What I did was I bought the dripper valves and measured approximately the thickness of the nozzle that goes into the plastic bottle with the thickness of a drill bit. This can vary depending on the size of your dripper nozzle so the measurements are not set in stone
- Drill holes (in my case 2 hole) into the plastic bottle (I used a 5L bottle) using the 3.3cm thick drill bit.

- Cut the PVC piping into an appropriate length. In my case I cut them to 25cm each as I only bought 50cm worth of piping. The bottle of water won't be very far from the cages so I did not need a lot. This to is tangible so feel free to alternate depending on your position of the bottle of water.
- Once it is cut into appropriate length attach one end to the dripper valve.
- Next spread around small beads of silicone around the edge of the dripper valve and once that is done shove the end of dripper into the holes in the plastic bottle and push gently. I used silicone as the bottle was a little uneven and I wanted to take the extra precaution to avoid leaks.

- As an extra precaution, once the dripper valve was in the plastic bottle I spread around a couple of beads of silicone. I spat on my finger to make it moist and spread around the silicone to make it nice and even. This was done an extra extra precaution to avoid any leaks.
- Once that's finished leave to dry for 24hours to ensure the silicone has dried and hardened and that any fumes are gone.

- Fill with water and position the bottle accordingly.
It's really simple to do. Honestly I used more time walking to the Agricultural store than actually construction this.
I hope this guide helped!